#3. How to use/setup Git in any project using Git Gui.
Read time : 5-6 minutes
Note : If you are already done with my previous post then you can skip step-1, step-2 and step-3. See my previous post :
How Setup git using Command prompt.
Step 1 : Git Installation.
First please download and install git from the following URL :
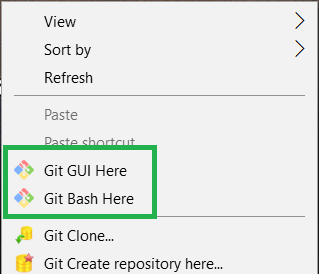
Verify the installation : If Git has been successfully installed , then you will find the following option when you right click on your desktop.
Step 2 : Registration and Project Creation on GitHub.
1. Go to https://github.com/ and register with your email address (don't worry, its free for personal use.)
2. Sign in with your registered email address.
3. Go to repositories tab and click on new to create a new repository (later we will use this repository to commit/push our code).
4. Enter Repository name (can be any thing) and click on create repository and your repository will be created.
Step 3 : Create a project into your local system .
Create any project (Project can be in angular, java, python , simple html or any language).Note : I have created a simple HTML (file name : dorado.html) and a CSS file(dorado.css)
See my project directory :
Step 4 : Push your local system code to GitHub .
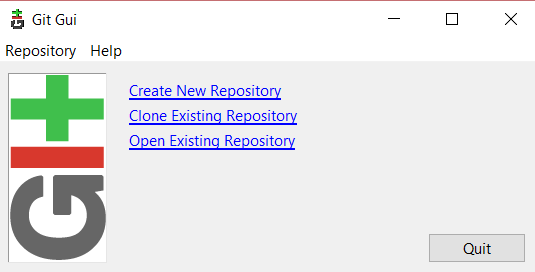
1. Go to project directory.2. Right click and click on Git Gui here , it will open a Git Gui Interface like following.
3. Click on Create New Repository , It will ask you the directory location (Give your project directory location).
4. Click on create , it will create a .git folder into your project directory.
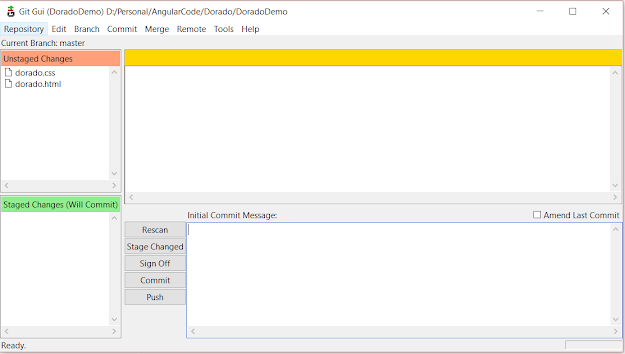
5. Now right click here and click on Git Gui here, so that it will open like following.
- Top Left area is used to display the files , which you have created , modified or deleted.
- Bottom Left area is used to contain those files which you have wanted to commit .
- How to add files for commit or into Bottom Left area :
- Method 1 : Click on any file from Top Left area (For commit) then go to commit option from top menu then select stage to commit. The file will now move from Top Left area to Bottom Left area for commit.
- Method 2: Click on any file from Top Left area(For commit ) then simply press ctrl + T . The file will move from Top Left area to Bottom Left area for commit.
- Method 3 : Click on any file from Top Left area(For commit ) then click on small file icon showing at the very beginning .The file will move from Top Left area to Bottom Left area for commit.
- How to Remove files from commit or move files back to Top Left area:
- Method 1 : Click on any file from Bottom Left area (to remove from commit) then go to commit option from top menu then select unstage from commit. The file will move from Bottom Left area to Top Left area and will not commit.
- Method 2: Click on any file from Bottom Left area(to remove from commit) then simply press ctrl + U . The file will move from Bottom Left area to Top Left area and will not commit
- Method 3 : Click on any file from Bottom Left area (to remove from commit) then click on small file icon showing at very beginning .The file will move from Bottom Left area to Top Left area and will not commit.
3. Top right area is used to show the difference between previous and current changes in file.
4. Bottom right area is used to give some commit messages, So that you can remember the
purpose of code changes or why you have made changes to the code.
7. Move files from Top left to Top bottom area to commit and give some commit message as well.
8. Click on commit button and then push , it will show the screen as shown below.
9. Now enter your git repository URL under Arbitrary Location and then click on push.
URL should be something like : https://github.com/gitusername/gitrepositoryname
In My Case URL is : https://github.com/dorado2041/DoradoDemo.git
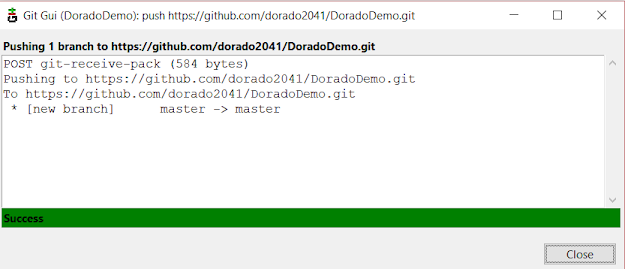
You will get the success message like this :
10. Go to your Git repository and refresh the page.
Conclusion :
This is all about How to setup use/setup Git in any project using Git Gui.In next post, we will see How to create branches, How to create pull request and merge that pull request to master branch.
For more updates please follow us on :
Facebook : https://www.facebook.com/dorado2041
Instagram : https://www.instagram.com/dorado2041
Blogger : https://doradosolutions.blogspot.com









No comments: